четверг 30 апреля
Azure Ad For Mac
May 12th, 2019App Dev Manager gives a walkthrough on how to get started with Azure Active Directory.When it comes to identity management, whether you’re developing a single-page app (SPA), a Web, mobile or desktop app, you need a full-featured platform that empowers you as a developer to support authentication for a variety of modern app architectures. Allows you to authenticate users using a broad set of identities, such as identities, as well as third-party identities and social accounts using. The Microsoft Identity Platform documentation is very rich with extremely exciting for various development platforms and client types.In this blog, we’ll walk through very quick steps to help you start experimenting with authentication capabilities using Azure AD identities.Here is what you need to follow through:. Access to an Azure account. If you don’t have an account, start here for.
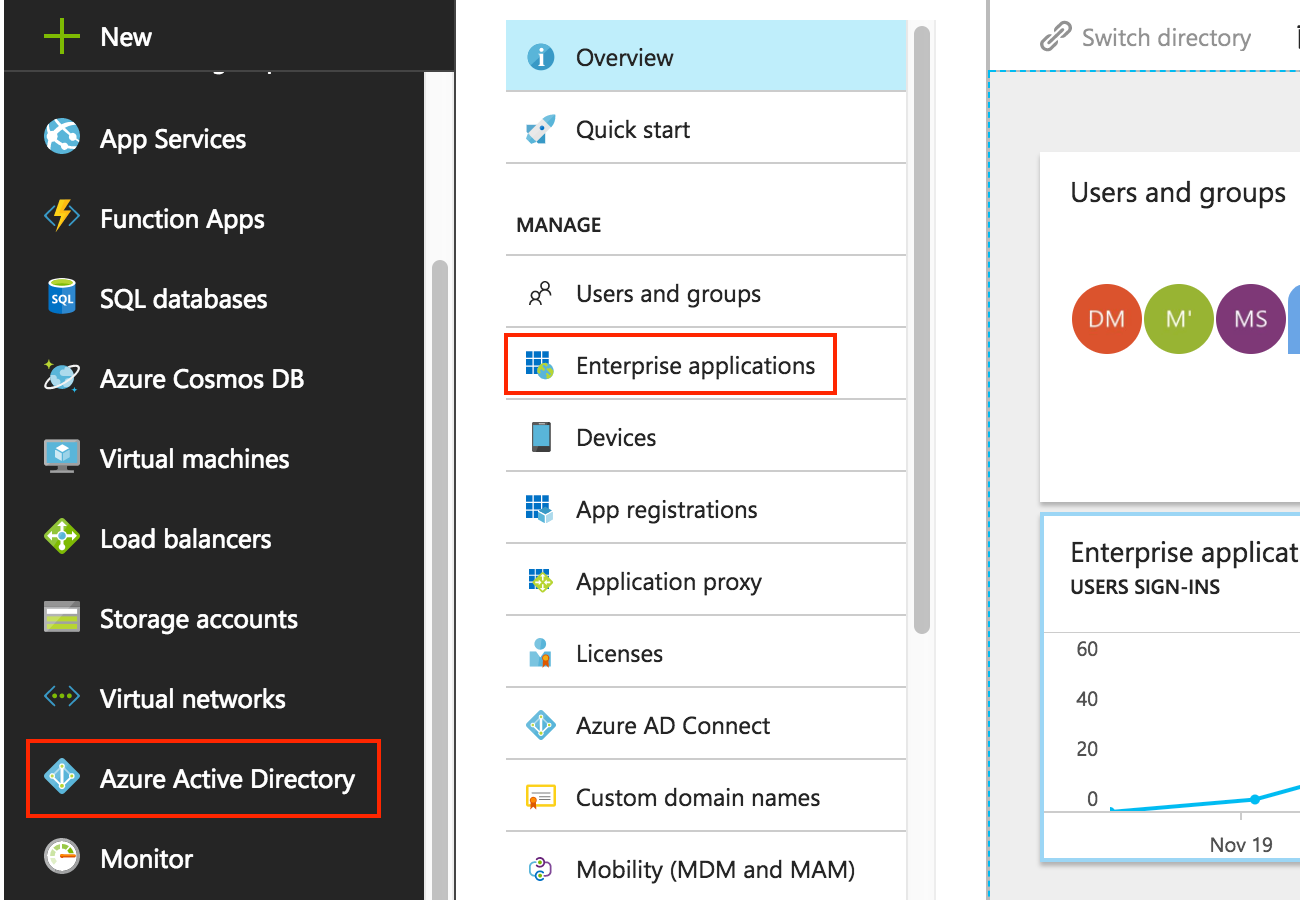
Access to an Azure DevOps organization. Start here forSTEP 1: Create an Azure AD Tenant. Login to. Follow clicks 1-6 depicted in the figure below. Choose an organization name that are unique to you. When the creation process is complete, click the confirmation link to switch to the newly created AAD, or switch to it by clicking on your login name in the top right corner of the Portal, and choose “Switch directory”.
In the newly created Azure AD directory, create one or more users for testing. Provide the new user information. For (2), make sure the domain is of the format.onmicrosoft.com, where is the “Initial domain name” you chose in the earlier step above. For (6) and (7), you need to copy the password and use it the first time for Alice to login. Alice be asked to change the password then. Alice is now good to goSTEP 2: Create a Web AppFor this step, we will be creating an Azure Web App to host our ASP.NET code.
By default, you can't connect to an Azure Windows server except through the Windows Remote Desktop client. To connect from OS X, whether through CoRD or the Microsoft Remote Desktop client for Mac, you need to turn off network level authentication: Connect to the Azure server using the Remote Desktop client on a Windows machine.
The site is a gallery of more than 750 templates to help you provision applications with various components and topologies with a click of button. The code for these templates is all open source.
We will be using the basic Windows Web App template for this step:. Point your browser to:. Click Deploy to Azure. This will take you to your Azure Portal to specify values for some parameters and deploy the Web App.
Enter required values to get the Web App deployed. Choose your subscription, create or choose an existing Resource Group, choose a location that is close to you, and finally, choose a unique name for your Web App.
Click “Purchase”. You can now quickly navigate to the resource group by typing the name in the search bar in the Azure Portal. In the resource group, you should be able to see the newly created App Service Plan and Web App.
Click the Web App in the resource group to navigate to its properties. Then point your browser to App’s URL. At this point, the Web App is ready for us to deploy some codeSTEP 3: Set up Your Azure DevOps Team ProjectFor this step, instead of building locally using Visual Studio and deploying to the Web App, we’ll be using Azure DevOps for a cleaner, more repeatable demo. Login to your Azure DevOps organization, and create a new Team Project. Choose a name and click Create. We are now going to import a Git repository from an project.
The Azure AD Quick Start GitHub repository contains lots of great samples to get you started using various technologies, including.NET, iOS, Node.js, and many more. For this step, we’ll be using the source for AppModelv2-WebApp-OpenIDConnect-DotNet. In your Azure DevOps Team Project, click Repos and then import a repository.
Enter the Clone URL: and click Import. You should then get a notification indicating the code is on its way. Now we need to set up a build. After the import is complete, click the “Set up build” button.
Look for the Azure Web App template and click Apply. From the Azure Subscription drop-down menu, choose your Azure subscription and click “Authorize”. From the App service name drop-down menu, choose the App Service we created earlier, then save and queue the build. Hp 4600 scanner drivers for mac. When the build task completes, if you reload your Azure web app in your browser, you should now be able to see screen below.
It’s exciting, I know, but do not click the “Sign in” button yet!
There’s a lot of noise in the marketplace about solutions. With organizations making the leap to the cloud with Google Apps, Microsoft Office 365, and other solutions, an is a perfect complement. On-prem solutions, such as Active Directory and OpenLDAP, don’t integrate well with a cloud-forward model. Furthermore, organizations are and Linux devices within their infrastructure rather than being tied to Windows. This shift in the IT infrastructure is changing the landscape of how directory services is being done. A core question that IT is asking about Microsoft’s cloud directory solution is, can you bind Macs with Azure Active Directory? Azure Active Directory Doesn’t Play Well With OthersAs you might expect, Azure AD doesn’t play well with Macs.
Active Directory doesn’t really play well with Macs either. Although you can do some basic authentication via AD, it is far more limited than what is possible with Windows. The challenge is that non-Windows devices now make up four out of five devices in an organization when you include smartphones and tablets ( ).While Windows is no longer dominant, Active Directory is managing less and less of an organization’s infrastructure. Add to that the fundamental shifts that we are seeing in the IT environment with the move to the cloud, a mobile workforce, and, and IT now has a significant uphill climb to centrally manage the infrastructure. When You bind Macs with Azure Active Directory You End Up In A Real BindA key part of that management process is. IT pros know that a unified directory service that is far preferred to managing user access on each system, application, or network.
Not only are there efficiency benefits for IT, but it is also better for end users. In addition, it is more secure.
That’s why as organizations look at Azure or Office 365, they immediately jump to the question of whether Azure AD can authenticate their Mac OS X devices. It can’t, but there is another path that is probably better suited to the needs of IT organizations.
Unified Cloud Directory Service, Level Playing Field. A unified cloud directory service can authenticate, authorize, and manage a wide variety of systems, applications, and networks. The ® platform from JumpCloud ® treats Windows, Mac, and Linux devices as equals. A most noteworthy feature is its ability to authenticate them regardless of their location. A small agent is placed on each system and user accounts are natively managed through each platform’s APIs.
In addition to binding Macs to the cloud directory, it can also seamlessly integrate with. User credentials from those platforms can be leveraged for access to other IT resources, thereby creating greater efficiency for end users and increased control and security for IT. Put JumpCloud On Your TeamLooking to bind Macs with Azure Active Directory? Unfortunately, that’s not the way that Azure is built. Instead, take a look at how JumpCloud’s works with Mac fleets. Easily and quickly solve the problem without jumping through hoops with Azure AD or on-prem AD. For yourself to see how it works with your Macs.
Your first 10 users are free forever.